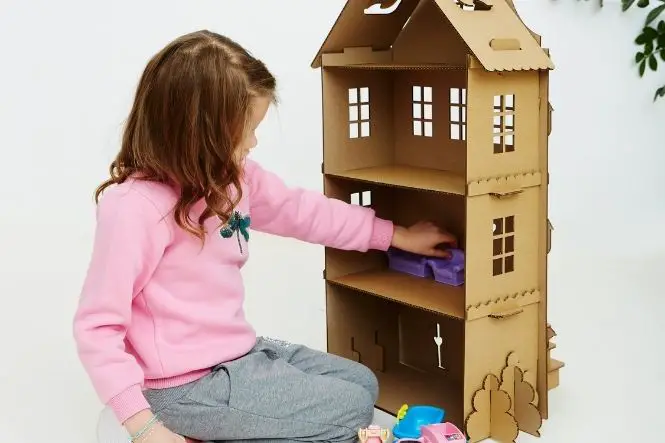
There are huge numbers of enthusiasts who build and create miniature homes brimming with antique furniture and fully functional electric circuits.
However, the whole point of making a doll’s house from cardboard, with and for kids, is that it is personal not perfect. It is an activity that will involve kids in the processes of creativity, design and modelling. Finally, they will get hours and hours of fun from their creation during valuable role play. This is the ideal opportunity for kids and parents to work through a project together and enjoy some quality time as a team.
Table of Contents
Four Walls
Start the process by selecting a cardboard box, as the main structure.
Your selection depends on the proportions of the dolls that are going to ‘live’ in the doll’s house. There are three main choices:
- A large box can be used and subdivided into two stories and four rooms using cardboard pieces for divides and polystyrene pillars for extra support. The main disadvantage of this method is that it can be fiddly and tends to be a weaker structure.
- Two medium boxes can be used effectively, fixed on top of each other to create sturdier stories. The only concern is to then divide the stories into rooms with simple cardboard divides.
- The best option (again depending on the size of the dolls) is to use four shoeboxes, for example, that are individually decorated and then fixed together to create the house structure.
The most important stipulation is that one side of the ‘house’ is kept open to enable decoration and play when the house is finished. If you have used cardboard boxes with flaps, carefully remove the flaps and fix together with lots of tape to form a ‘mock’ gabled roof.
The next step is to complete the structure of the house by carefully drawing a door onto one of the outside walls. This is really just a ‘dummy’ door and could also be made using a picture cut from a magazine.
Cut windows from the card using a craft-cutter (make sure this is a grown-up task). Small squares of clear plastic, such as that found on food or toy packaging can then be fixed to the inside of the windows to give the effect of glass.
Finally you may want to add stairs to the main structure. Again, these are more decorative than functional and consist of a strong strip of cardboard that has been folded concertina-style.
Give the outside walls a realistic effect by covering in stone or brick patterned paper. Alternatively, paint it a country- cottage, pastel colour which has been mixed with a little sand, so it looks like render.
Interior Design
The next step is to decorate the inside of the doll’s house. It is quite fiddly but with patience and thought, excellent results can be achieved. The child can select a ‘colour scheme’ using bright or patterned wrapping paper. Wallpaper samples are handy too. Alternatively, a 3D effect is achieved by pasting appropriate pages from lifestyle/ interior design magazines to the walls of the house. When you are happy with the walls, carpet the new home with scraps of carpet samples and thick pieces of fabric to create rugs. Another effective floor covering is wallpaper with a raised pattern which has been painted a suitable colour.
Accessorise
The really fun bit is filling your doll’s house with furniture and accessories. The only limits are your child’s imagination. Small food boxes, egg cartons and tubs are easily converted into sofas, beds, basins and tables using blobs of plasticine, sticky tape and fabric. To ‘upholster’ miniature furniture, try stuffing pockets of fabric with lots of cotton wool. It‘s a great exercise in design for kids to look at junk with fresh eyes. How could that tin foil become a mirror? Could a small cream cheese tub become a large and luxurious bath tub?
A Bit of Outside Space
A garden is created as easily as keeping a square of green fabric to spread out beneath the doll’s house each time it’s used. Or you could make a garden by painting a square of cardboard grassy green, with brown strips and shapes for borders and vegetable patches. Add a few tiny silk flowers cut from old clothes or bought from craft shops and some bunches of green sponge for shrubs and greenery.
A doll’s house is a timeless, traditional toy. There is no better or more economical way of becoming the proud owner of a doll’s house than making your own. It will be unique, educational and heaps of fun to make.